


I gonna show the simple process that is behind this composition. We will deal in particular with blending options and textures customization. This tutorial can be followed by Photoshop newbie without problems.
To all Stargate lovers, let’s start!
Step 1

Create a new 2480×1748 pixels document in Photoshop, grab the Paint bucket tool (G) and fill it with black (#000000).
new document in Photoshop
Step 2

Create a new layer, select the brush tool (B) and use a large soft (hardness 0%) white brush to create some spots in the center of the canvas. Reduce the opacity to around 10%. Create other spots on different layers. In this way we realize a soft light effect in the center. Some of you may think that it’s more simple to directly add a radial gradient to the background instead of using the brush tool and several layers. But I prefer brushes because they give me more control and give a more various result.
light effect center
Step 3

Download our concrete textures set (or the free sample in case you are not a member). Open the texture in Photoshop and drag it into the main canvas. Press ctrl+T to activate the transform tool, then resize it to match the canvas dimensions. Press shift+ctrl+U to desaturate the texture and set the layer blending mode to overlay with opacity 35%.
concrete texture
Step 4

Download this free image of a Great Sphinx and open it in Photoshop. Press shift+ctrl+U to desaturate the photo:
sphinx
Step 5

Press ctrl+L to open levels window and use the arrows to increase a lot image contrasts:
levels
Step 6

Drag this image into the main Photoshop document and set the layer to multiply to eliminate all white areas and retain the black ones. Put the Sphinx at the bottom as shown in the screenshot below:
Step 7

Create a new layer and go to Filter>Render>Clouds. Now press ctrl+T to activate the transform tool and enlarge a lot the image without modify its height.
clouds
Step 8

Set the layer to screen and reduce opacity to 20%. We have so used clouds to make more vivid the edges of the composition and create a kind of fog effect.
fog effect
Step 9

For the type treatment I’ve used a free sci-fi font titled Perfect dark. Write a word or a phrase. In case letters are too close, open the character window (Window>Character) and modify distances.
Step 10


Right-click on the text layer and select “blending options”. Here reduce fill opacity to 0% and add a 5px stroke:
Step 11


Step 12

Step 13

Now to create the 3d effect simply move lower down the last created layer. Here is what you should obtain:
Step 14

Grab the rectangle tool and create a shape below the text effect. As we made with the text in step 10, reduce fill opacity to 0% and add a stroke effect.
Step 15

Go to Edit>Transform>Perspective and bring near the bottom anchor points as shown in the screenshot below:
Step 16

We have to repeat the same technique used with the text to change the stroke color and add an outer glow: create a new layer and marge it with the one of the shape. At this point right-click on the layer thumbnail and add the same styles used before with the text.
Step 17

To complete the type treatment, add a 3d look to the shape with the same method used for the text: duplicate the shape layer and move the duplicated below the original one. Apply to the the duplicated layer the motion blur filter and move the layer lower down. Here is my result:
Step 18

Let’s start adding color to the composition. Go to Layer>New adjustment layer>Gradient Map and add a gradient going from dark purple (#290a59) to cyan (#00f0ff). set this layer to overlay with opacity 60%.
Step 19

Download our Old Paper Textures Vol1 (or the free sample). Open the op5 texture in Photoshop. We will use this texture to create the dirty noise effect. Press shift+ctrl+U to desaturate the image. Then press ctrl+I to inverse colors. Finally ctrl+L to activate levels and increase contrasts:
Step 20

Drag the texture into the main canvas. Re-size and rotate it (ctrl+T) and set the layer mode to screen:
Step 21

Create a new layer and fill it with black. Go to Filter>Render>Lens Flare and choose the 50-300mm zoom lens. Set the layer blend mode to screen.
Step 22

At this point I’ve decided to play a little bit with color corrections. I don’t like this blue atmosphere, so I’ve added a new gradient map layer (Layer>New Adjustment Layer>Gradient Map). This time I’ve used the default gradient going from purple to orange. Set the layer to overlay with opacity 50%. You can notice an atmosphere warmer now.
Step 23

I’m still not satisfied with the color result. Let’s apply a third gradient map, this time the default gradient going from purple to yellow (check reverse). Set the layer to overlay with opacity 30%.
Step 24

The last adjustment layer: Brightness and contrasts (Layer>New Adjustment Layer>Brightness/Contrast). Increase brightess to +20 and contrast to +10.
Step 25
To brighten up the center, create a new layer and move it below the adjustment ones. Set the layer to overlay. Grab a large soft yellow brush and make a spot in the center, over the lens flare. Reduce opacity to around 25%.
Create a second layer (always set on overlay). This time grab a purple brush and paint over the edges of the canvas, in order to add color to the noise effect.
Here is my result:

Step 26

A nice way to give a retro look to this image is to use a micro-pattern, to obtain an effect similare to old videogames screen. Create a new 5×5 pixel document in Photoshop (with a transparent background), zoom in, grab the Ellipse tool, hold down shift and create a circle in the center of the canvas. Then go to Edit>Define pattern and save the pattern. You can now eliminate this document and switch to the main canvas.
Step 27

Create a new layer immediately above the group of text layers. Go to Edit>Fill and select “pattern” for use and choose the pattern just created. Finally press OK.
Step 28

Reduce fill opacity of the layer to 0%, and add a blu (#0d6fe8) color overlay set on “color burn”.
Step 29

Create a new group below the pattern layer and switch the blending mode to “color dodge”. Title this layer “text light effects”. Create a new layer inside the group, grab a white soft brush and start making some spots over the points you want to enhance. You’ll notice a strong light effects due to “color burn” blend mode. Reduce the opacity of the layer to reduce light brightness. Create several spots on different layers and play with their opacity.
Step 30
The composition is almost complete. The last touch are some text effects placed at the bottom of the canvas – main actors’ names, and our work will look like a cool movie poster. The font used is Colaborate.
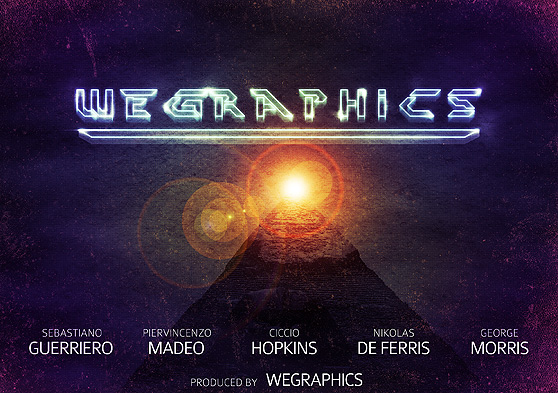
Here is the final result:
This original post by www.wegraphics.net.
I really appreciate their work always they provide so many tutorials of photoshop and so many today i upload their post in my blog only for educational purpose.
because i also a fan of sci-fi movies and i always want to make sci-fi movie its sounds like kidding but seriously after this tutorial you also wants to make you movie poster soon i hope you like this one


Good readers always drop comments!!